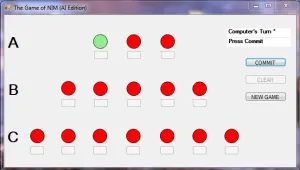
The game of NIM is a fun strategy game invented in ancient China. Although there are many variants, the version I learned includes 15 items (sticks, stones, or whatever else you have lying around) arranged in 3 rows (3, 5, and 7 items respectively). The rules to NIM are simple: A player may take as many items as they like from only 1 row in a given turn. Turns alternate between two players max. The player with the last item looses.
I’ve been fascinated with this game since 9th grade when I learned it from my Math/Computer teacher (boy, I wish I could remember his name to give him credit – he was great!). We had a class project involving writing an Artificial Intelligence version of the game on an Apple II in BASIC using simple ASCII text – my first introduction to AI. A few months ago, that memory was somehow triggered and I decided to re-write the app in Visual Basic .NET. I started with a basic version that allows game play for 2 humans (v1). Next, I branched the code and attempted to develop an AI version. Wow – that was much harder than I expected. I then created a v3 that used an algorithm I found online. Finally, I created a v4 that interfaced with an electronic game board via USB cable, and offered both AI and algorithm modes.
Witness the Singularity
The AI version of the game is founded on the basic principle that when the computer looses a game, it should remember the last move it made and never do that move again (unless forced). If all the possible moves in a given scenario are marked as “learned”, then remember the second to last move made, … and so on. If the computer wins, it learns nothing. To accomplish this, I had to leverage a multi-dimensional array memory structure that helped me track all the moves. When starting, I initialize all the places in the array to zeros. When the computer wants to remember a move, it flips the bit to a one. So, with each move, it first checks the array to see if there are legal moves it should not select based on earlier learning.
My first attempt at writing this was to build a memory structure to capture every possible move. There are a maximum of 15 moves, and each move can allow a user to select between 1 and 7 lights. The number of options decreases as the game is played. I figured the worst case scenario is when each player takes only 1 light each turn, so I defined the array like this:
Dim iMatrix(15, 14, 13, 12, 11, 10, 9, 8, 7, 6, 5, 4, 3, 2, 1) as byte
I tried to run this and got an out-of-memory runtime error. Yikes – turns out defining it like this requires over an Exabyte of memory – I’m not quite to that capacity yet on my laptop, so back to the drawing board. I investigated options that would allow me to use bits instead of bytes in order to reduce the memory capacity used, but it turns out VB.NET cannot support binary data types. Even so, this would only divide my memory requirement by 8 and it’s still no where close to the amount of memory I have available. The whole time I kept thinking – there must be a better way since we got this thing to work on an Apple II years ago and it had very little memory!
After weeks of being stuck, something occurred to me – I don’t really need to track the humans moves, all I care about is the computers moves! That got me thinking that there are 2 main scenarios that drive the number of options: Human goes first or Computer goes first. So, I redefined the memory structures to look like this:
Dim iMatrix1(14, 12, 10, 8, 6, 4, 2, 0) As Byte Dim iMatrix2(13, 11, 9, 7, 5, 3, 1) As Byte
Now, iMatrix1 requires only 2MB of memory and iMatrix2 requires only 630KB. Yes, that’s much more reasonable. In fact, I can put both structures into memory together without much problem. I was very happy to find the VB.NET functions for BinaryFormatter.Serialize and .Deserialize which made it very easy to dump and retrieve the values in both arrays to files quickly, so I could save my learnings in between sessions and not have to start over each time (like I did on the Apple II).
It is really something special to play against the computer in this mode. You can easily beat at first because its moves are predictable – like a human child. I found myself playing game-after-game using patterns to watch the learning process. Each time it lost, it learned from its mistake and never made it again (unless it was forced). I lost track of the number of games I played with it – each time it was getting smarter and smarter. Simply fascinating.
The secret of NIM (no pun intended) is that the player that goes first has an advantage. So, I added some logic to the game that allowed it to learn this fact. If it learns enough, it will eventually figure out that in a game where the human goes first, all the possible first moves result in a loss. Therefore, the only way to win, is insist on going first. Frankly, it freaked me out a bit as I was testing when this actually occurred – it stopped randomly selecting a first player and just insisted on going first every time. I’ve not yet had the time to teach it to be unbeatable, but I’ll keep working on it…
Using the Algorithm
The Algorithm version (v3) of the game uses a simple but effective math trick to determine the optimal next move. There are many web sites that discuss this algorithm, but I’ve found this one to be the best. In a nutshell, it uses bitwise XOR logic to find the next move. It took some time to interpret this algorithm into VB.NET code for me, but I finally succeeded. I was disappointed to see that the algorithm breaks down at the end of the game. It fails to identify an opportunity to make an aggressive final move to win the game. So, I augmented the algorithm with some of my own basic if/then logic. The end result is formidable. I’ve only found 1 scenario where I can beat the computer using this technique.
The Game Board
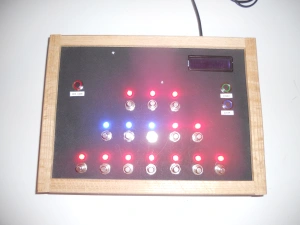
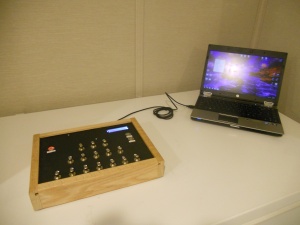
From the beginning, my vision was to evolve the game from pure software, to a version that uses a game board with buttons and LEDs. I must admit, it turned out great and exceeded my expectations. I got to use carpentry and electronic skills in order to create the game board and I learned a LOT during the process.
The board itself is made of a 3/16″ thick piece of plastic. I bought 4 different types of plastic board from McMaster-Carr, but settled on High Density Polyethylene (HDPE). HDPE is wonderful stuff – it machines almost like wood. I was able to easily use my bandsaw, drill press and other tools and never had a melting issue. I used a Dremel to cut out the hole for the LCD display. Truth be told, I had to build this board twice because I screwed up badly on my first attempt cutting out the LCD display.
For the lights, I used a common cathode RGB LED since it lets me show multiple colors in a single bulb form factor that I can use to show availability (red) and selection (blue). I selected 2 different types of buttons. I used inexpensive SPST momentary push buttons for the 15 selection buttons. For the New Game, Commit, and Clear buttons, I wanted to have lighted buttons to show when the button is active. So, I selected 3 different colored switches from Amico’s Angel Eye collection. I used red for the New Game button, Green for Commit, and Blue for Clear. Hopefully that will help make game play a bit more intuitive. I like the Angel Eye buttons a lot, except that they require a big hole and are quite deep.
For the game board display, I selected a 16×2 character LCD display from Sparkfun. I picked white on black for maximum contrast and readability. Sparkfun also has a very handy Serial Enabled LCD Backpack that makes working with the LCDs much easier, and significantly reduces the number of control wires required. All I have to do is send a text string or pre-built commands on a single serial wire and it displays on the screen. I especially liked the ability to adjust the address so I could over write just the top or just the bottom row.
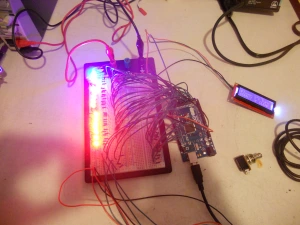
The brains of the game board is an Arduino Mega 2560 R3. I evaluated several different options and concluded that the Mega was the only one that would provide enough IO pins to meet my needs. In fact, I needed every last IO pin the Mega offered for this project! I know I could have used a shift-register chip to multiplex my IO pins, but the Mega was just easier. Plus, I had already written a very nice Serial interface sketch for an earlier project that I was able to reuse with minor tweaks to allow interface with the 16×2 LCD display. After much searching for a Mega Screwterm shield that would meet my needs, I ultimately decided to just buy the MegaShield kit from Sparkfun. It was a major pain because of the way it is laid out with +5V and Ground bars running down the side. It forced me to do some ugly wiring on the shield that I’m not proud of.
I build a wooden frame for the board using some scrap Red Oak that I had left over from an earlier project (it smells soooo good when you cut it). I used a router to cut out a 1/4″ notch to allow the HDPE board to sit snugly inside. I also routed the edges to give it a finished look and to avoid any sharp edges. As a nice touch, I cut a square hole for the USB cable and attached a Panel Mount USB (B Male to B Female) cable from Adafruit inside. This let me have a clean look and more easily detach the USB cable when not in use.
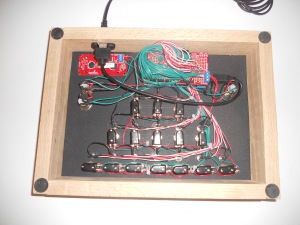
The underside of the game board is a wiring nightmare. I attempted to use colored wire to help keep track of the different functions, and also used zip ties to keep things a bit more tidy. Due to the wiring on the Mega shield, the underside of the game board was much taller than I anticipated. I was originally thinking of closing it off by using another HDPE board, but opted to leave it open for easy repair access if needed.
Future Plans
At some point, I’d love to convert the game logic to another language and port it to a RasberryPi or some other small single-board computer so the game board does not need to be tethered to a PC/Laptop to work.
Here is a video of the finished product:
Here are some pictures of the build and finished product.
NIM v1, v2 and v3 all had a software user interface
Prototyping the electronics on a breadboard
The game board attached to a laptop
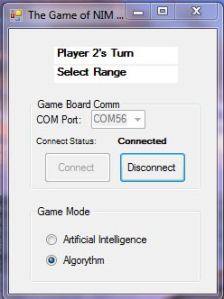 A screen shot of the Windows app that runs the game board
The back of the game board – a rats nest of wire


4 Comments