

November, 2018
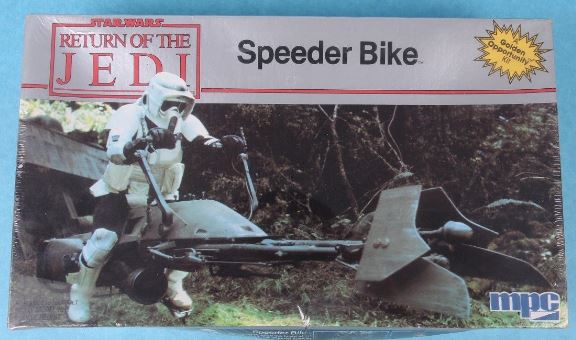
Earlier this year, my daughter decided to add another cosplay to her collection – an Endor Leia from Star Wars. My wife has been a member of the 501st for several years and has a great Scout Trooper costume that she loves to wear. In keeping with the ROTJ Endor theme, we mused with the idea of making Speeder Bikes that they both could wear and maybe chase each other. So, I accepted the challenge and embarked on an ambitious journey to rapidly finish a pair of speeder bikes in time for an annual Children’s Parade the day after Thanksgiving.
Design
My wife owns a detailed, scale, plastic model of a Speeder Bike. We used this as the foundation for all of our measurements. We precisely measured the model’s dimensions using a caliper and translated that to plans for the project. I felt it was important to get the proportions accurate so it looked realistic. I painstakingly modeled the curves, and I think it paid off in the end.
I used my drafting table to create full-size templates for some of the pieces including the front fins and templates for bending the curves of the PVC.
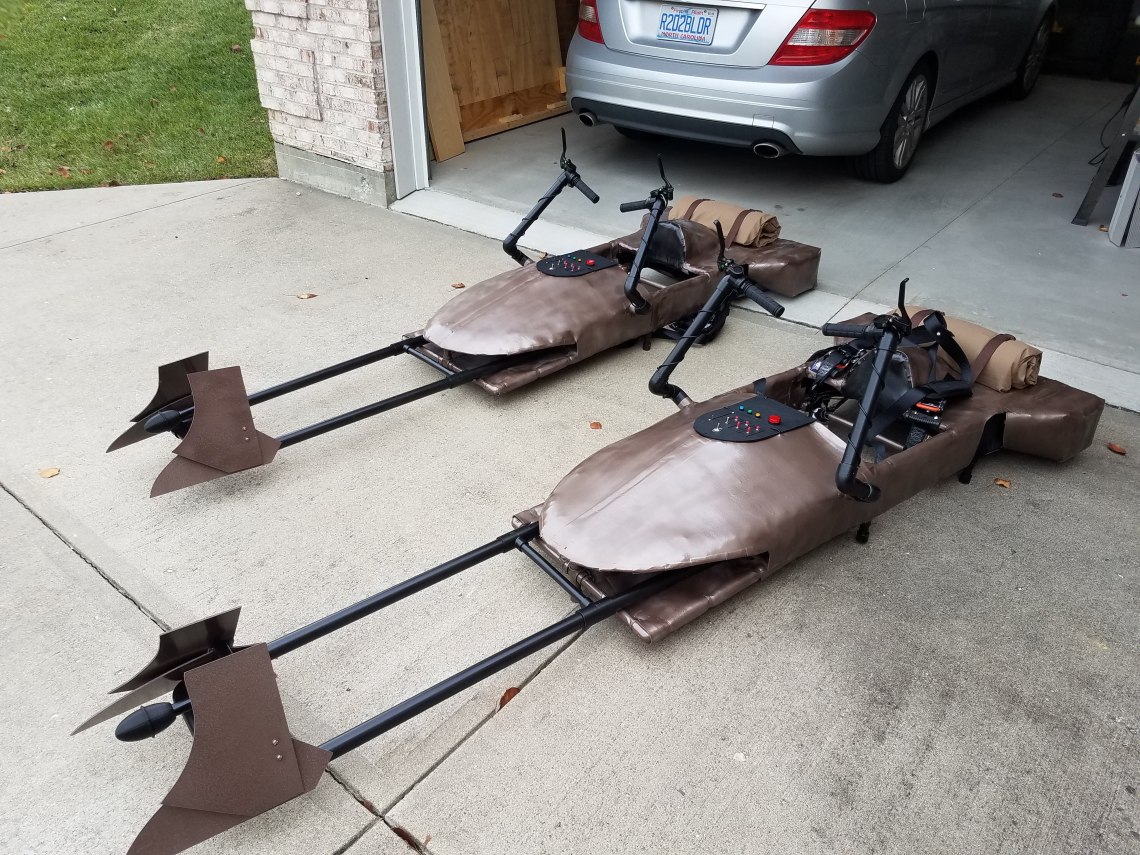
The Frame
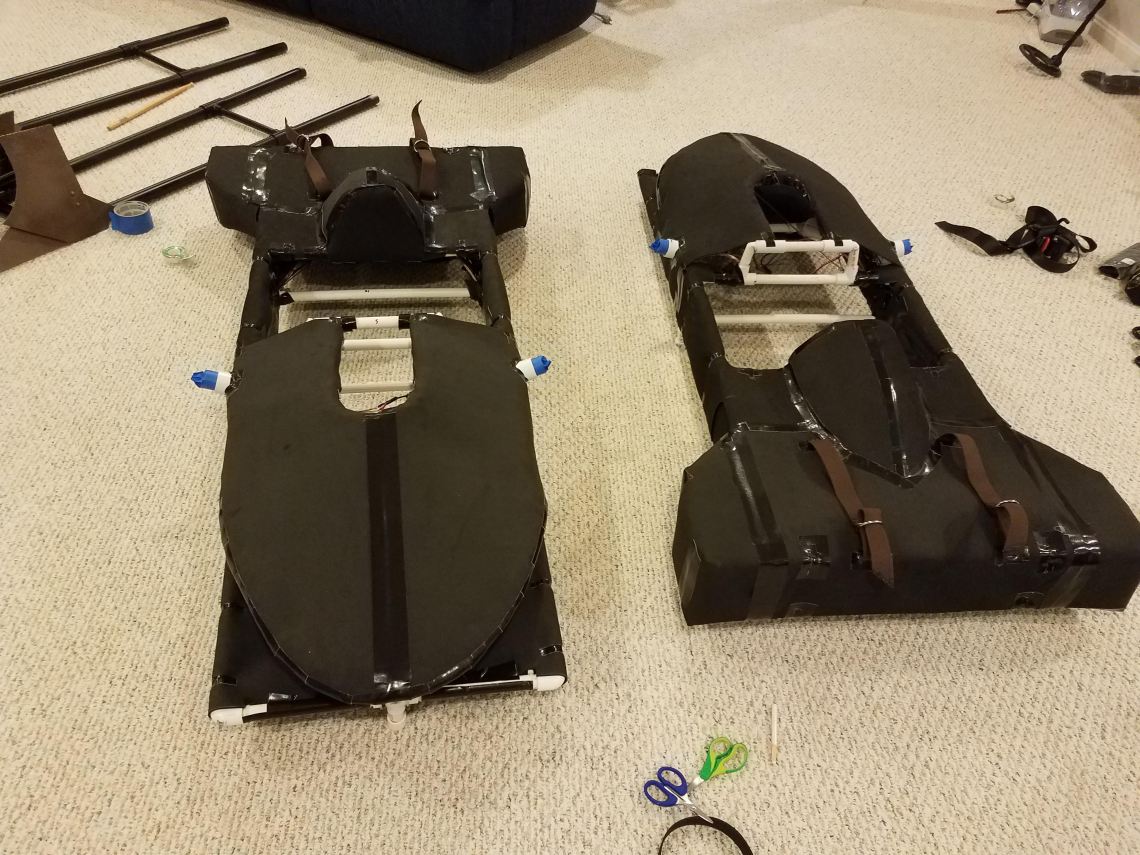
One of the key design goals was to select material that was as light as possible since this whole rig would need to be worn and would put a lot of pressure on the shoulders. At the same time, I needed a rigid frame that would keep its shape. So, I selected Schedule 80 PVC (thin wall PVC). Schedule 80 was the perfect combination of material that was easy to bend when heat was applied, but was quite strong, and yet lightweight. The only exception was the 2 cross bars on the bottom part of the frame that I would hook the harness to. I knew these would take a lot of stress, and I didn’t want them to warp, so I used Schedule 40 (thicker wall PVC) for these pieces.
Using the scaled dimensions of the model kit, I cut the PVC to size and assembled all the necessary connectors. I press-fit the pieces together and we evaluated the result. We went through a few iterations of the deign before settling on the final configuration. PVC is great for rapid prototyping – kind of like Lego’s!
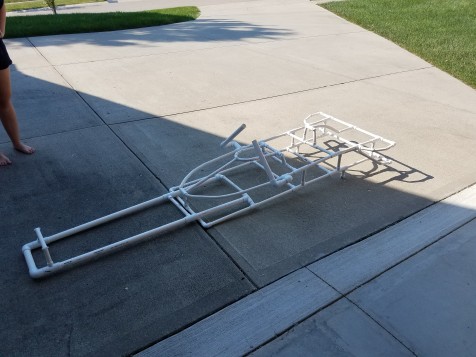
I tried my best to think ahead and anticipate all the things I would want, including small feet to keep it off the ground, and support for various accessories. At this point, I disassembled the whole thing, and measured each piece so I could build a second one of the exact specs. During this process, I found I had slightly mis-sized a few pieces which was causing some minor warping and unnecessary stress on the joints, so I’m glad I was able to correct them.
Next, I disassembled each one again and permanently connected them with PVC cement. I hammered each joint together for a tight fit, and found the frame to be quite sturdy. There were a few “panic” moments when I had to rush to adjust a fit before the PVC cement dried (the work time is very short). I admit I had to visit the hardware store a few times during this process because I failed to follow my own directions and glued parts together incorrectly. I was rushing and made some stupid mistakes.
I found it necessary to do some custom bending of the PVC in order to get the shapes I needed. I reserved the bends for parts that were not load-bearing. The distinctive curve of the front was critical to get right in order to make the Speeder bike look good. I have a professional hot air gun that I used to warm parts of the pipe and allow bending. I built templates out of plywood to help me get a consistent bend for both bikes. Toward the end, I got really good at this, but there was a learning curve that resulted in some waste.
There were 3 sets of joints that I intentionally left unglued: The forks, and 2 joints on the elbow of the handlebars. I did this because I needed to take these parts off during transport and storage, and I also wanted the ability to adjust the handlebars when the build was complete to make it more like the movie.
After the frame was assembled, I found that the fork was putting a LOT of pressure on the front cross bar and I was concerned about warping, especially during walking. So, I found some galvanized, coated hanging wire, and devised a plan to provide diagonal support for the front center to help take some of the weight – it worked great! Although it was probably unnecessary, I repeated the process for the back. I used wire rope clips to fix them in place.
Electronics
No build of mine would be complete without some cool electronics. In keeping with the Speeder Bike design, I wanted to provide a control panel with various switches, buttons and LEDs, similar to the ones in the movie. However, I wanted to make them functional.
I started with the audio system design. I used various sites on the internet to capture speeder bike sound effects like this. I used an Adafruit Mini FX Sound Board (16MB) to drive the triggered audio effects. I wired it to an Adafruit 20W Class D amplifier board. The goal was to make it loud enough to be heard outside in a Parade or in a crowded con hall.
Next, I found a pair of nice, inexpensive Planet Audio TRQ413 Torque 4×10″ 400W speakers. They weigh about 1 pound each, due to the heavy magnet. I intentionally picked big, heavy speakers, because I knew I would need to add weight to the back in order to help counter-balance the long forks in the front. These things sound really great – I cranked the amp to max volume and there was no distortion or cut-out after I bolted them onto the PVC frame.
Next, I designed a control panel using the Easel software and carved it into a 12x12x1/8″ PVC sheet using my X-Carve.


I inserted the switches, buttons and LEDs, and soldered wires to the control boards. The control design is pretty simple:
- Top toggle switch is the main power for the whole system (DPDT switch to control both voltages with one switch)
- There are groupings of button/toggle switches that drive the audio playback. I settled on 3 main sound effects. Two are long-running (3-5 minutes each), and one is short (just some laser blast and explosion sounds). I knew for a parade, we’d want to just have a continuously running sound track, so the toggle switch will keep the sound playing indefinitely, while the momentary button will just play it once.
- I used a 10K slider pot as the volume control. I intentionally did not put a knob on top to make it look more like the control panel of the real speederbike.
- I put 4 LEDs along the bottom – 1 big and 3 small. The big LED shows main power. The others show the various states of the audio playback.
I used modular jacks to allow me to complete the frame without the control panel and then install it last (so I didn’t get any paint on it). I securely taped all the wires to the frame, and cut them to length.
To power the amp, I needed a 12V power source. As another counter-balance technique, I decided to mount some AA battery holders in the very back of the frame. I added a 5V regulator to give me the proper voltage needed to drive the Audio FX board. In addition, I also mounted two 92mm fans into the back of the frame that I planned to expose later. I intentionally avoided adding power to these fans to make them spin – while spinning, it’s really hard to tell they are fans since you can’t see the fan blades.
Forks
One of the more distinctive features of the Speeder bike is the front forks. Each side has 2 fins that overlap. I knew this could be potentially dangerous when walking around crowds because people could get hurt if they got skewered! So, I attempted to build these out of soft foam. Unfortunately, I found that they would not hold their shape, so I had to settle for lightweight, 1/8″ rigid foam. It came in a big sheet, so I used paper templates to trace the design, and cut them out with a jig saw. I took them to the belt sander to do the final shaping.
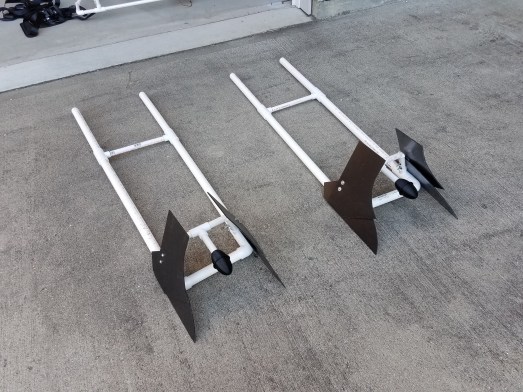
I cut small pieces of the same foam to act as spacers in between the two fins to give the proper 3D layered effect. I put 2 bolts through each pair of fins to attach them to the PVC frame.
I never noticed before, but the Speeder Bike has an egg-shaped ornament in the front between the two sets of fins. To create this, I designed and printed it on my 3D printer.
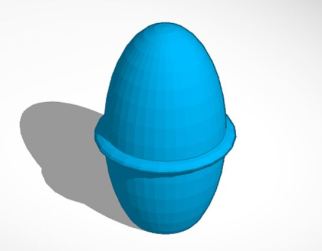
I used 10% fill to keep it lightweight, but strong. I included a hole for a set-screw to fix it to the PVC pipe. I printed it in black PLA, and no painting was required – it adds a nice touch.
Handlebars
The handlebar design was fairly simple – just some 1″ PVC and a few elbow pieces. However, I added some extra touches to make them look great. First, I bought some black, rubber bicycle handlebar grips and glued them onto the PVC pipe. This provided a comfortable grip, and a nice look.
After close inspection, I saw that the Speeder bike has some sort of control handle that sticks straight up on the outside of the handle bar. I bought a pair of bicycle hand breaks with long wires. They looked great, but I needed a way to mount them properly onto the handlebar. So, I 3D Printed an adapter that allowed me to mount it properly.


I printed it with black PLA using 80% fill for strength. I used a worm gear pipe clamp to affix the 3D-printed part to the PVC elbow. Then, I mounted the handbrake to the cylinder, and oriented it to point straight up. I took the long cord and wrapped it around the outside of the handlebar for a cool effect. I drilled a hole at the bottom of the handlebar and pushed the wire in, then put a zip-tie on and cut the excess wire.
Skin
The goal was to give the appearance of rigid, brown metal, but using very lightweight material. I found some inexpensive rolls of 2mm flexible foam, but realized quickly that the foam would sag in some areas due to lack of support. So, I decided to first cover the frame in Chicken wire fencing.

Blood, scrapes and pain – that, more than anything else, is what I will remember most about this build. The chicken wire is evil stuff that tore up my arms and hands. Although it perfectly suited my needs, I hated working with this stuff! I used zip ties to affix the demon-wire to the PVC frame.
I installed a pair of canvas D-ring belts onto the back of the frame to strap down the bed roll. I used bolts, washers and nuts to attach them to the PVC frame and cut holes to expose the ends. I cut the belts to length and cauterized the ends to stop them from fraying.
It was a huge relief to be able to cover the chicken wire with the foam so I would not have to endure any more pokes or scrapes. The chicken wire did a great job of preventing sagging by providing the necessary support. I used paper templates to design the foam panels – 11 total panels to cover the top, sides and some of the bottom. I used zip ties and gorilla tape to keep the foam in place.
At this point, I was thinking that they looked like “stealth” Speeder Bikes. This was really coming along nicely! Now, if I could just avoid screwing up the paint, it will look great!
Paint
Never before on a project have I so grossly underestimated the paint required to complete the project. I knew the foam would absorb the paint, but I had no idea how much! This phase of the project resulted in repeated visits to multiple hardware stores since I kept emptying the stock of each store I visited.
I started with a layer of primer. Long story-short, I found it best to use Rust-oleum Filler Primer to build up a layer of paint between the foam and the tape so it was not as noticeable. I ended up needing 6 spray cans of primer for each Speeder bike.
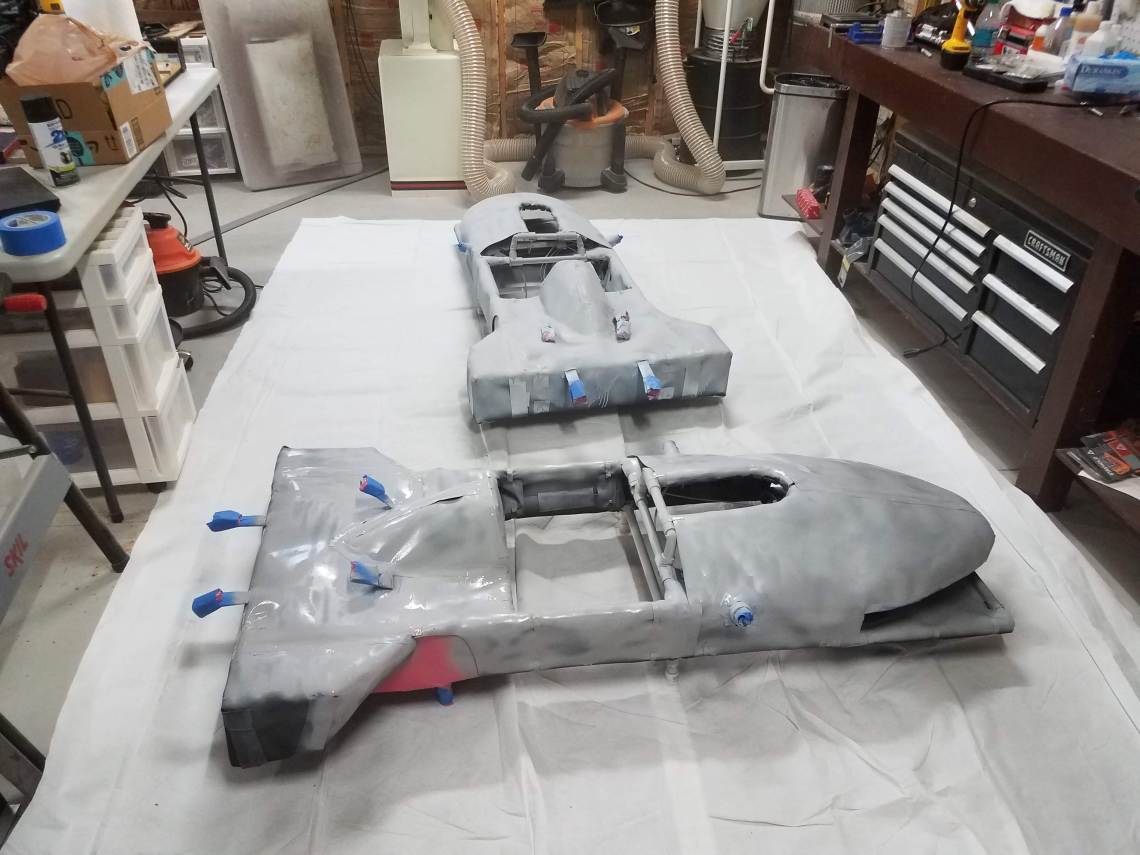
Unfortunately, even with multiple coats, it did not work as well as I would have liked and the tape lines were still quite visible. Also, the primer did not stick will to the Gorilla Tape which resulted in flaking later.
Next, I moved on to the final coat. I used Rust-oleum Brown Hammered Spray paint to give the appearance of distressed metal.
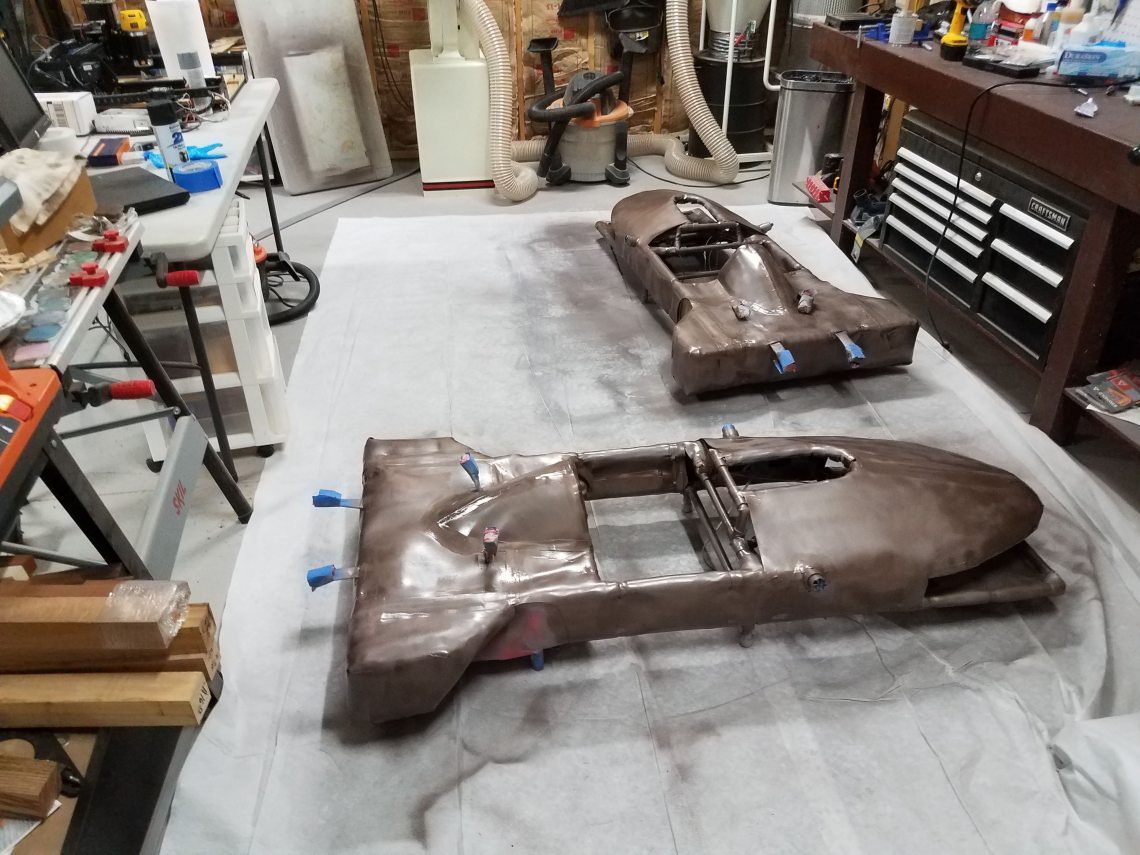
I used 4 cans of brown spray paint for each Speeder bike. I hand-painted the inside of the hump and the feed with black paint, and gave them a quick clear-coat spray.
For the forks, I used black spray paint for the tubes, and the hammered brown spray paint for the fins. For the handle bars, I also used the same black spray paint. I covered all the black paint with a clear, satin protective coat to prevent it from flaking.
I chose to keep the battery pack and fans covered with foam during the painting process to avoid getting paint on them, and that turned out to be a very good decision. After the final coats of paint dried, I was able to quick cut shapes in the foam to reveal them. My wife did a great job of making “license plates” that acted as a cover for the battery pack – they look great! 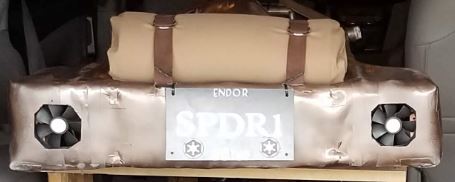
SPDR1 and SPDR2 – made with white Vinyl cut out with a Cricut. We sealed the Vinyl letters to the black PVC sheet using clear fingernail polish.
Harness
The final assembly step was to attach the shoulder harnesses. I chose ratchet straps to allow the length of the strap to be adjustable (since I wasn’t sure how long the straps needed to be. The goal was to have it hang just at the upper thigh – simulating sitting on the seat. I selected a set with wide straps (1.6″) and big hooks to fit around the 1/2″ PVC pipe in the frame.
In order to keep the hooks from sliding on the pipe, I came up with a clever approach: I took a 1/2″ PVC T-Connector and cut it into quarters on the bandsaw. I took the L-bracket and secured it onto the PVC frame using a worm gear hose clamp. I put some tape over the hose clamp to prevent snagging, and the whole thing worked really well.
For comfort, I bought some shoulder strap pads, and they Velcro-attach around the strap. These helped a lot. Unfortunately, they slid quite a bit and I found my self continually chasing and adjusting them. Once I had the straps sized properly, I cut the excess straps and cauterized the ends to keep them from fraying.
Balancing
After final assembly, I asked each of my models to try on the Speeder bike and prepare any final adjustments. I crossed the straps to help keep them secure on the shoulders, and used rivets to secure them. I also used some strategically placed cross-straps to further help keep the straps from sliding off the shoulders.

After some trial-and-error, we found the “sweet spot” length for each of the straps – different for each model. The ratchet straps allowed for easy adjustment without compromising the security of the straps. Unfortunately, the ratchet system added quite a bit of weight, which I was hoping to avoid – each set weighted 4 lbs.
My goal was to make the Speeder Bikes slight back-heavy to avoid the risk of having the forks hit the ground. Also, I wanted the handle bars to be for show only, and did not want to use them to adjust the pitch of the bike. To achieve this, we found we needed just a bit more weight into the back. In the end, I ended up adding 2 bottles of Voss water inside the rear bedroll – it provided the perfect amount of extra weight. It also came in handy after the parade when we were thirsty!
Conclusion
I am afflicted with a terrible curse: When I look at one of my creations, I can only see the imperfections and berate myself for not doing better. When I look at the final results of this build, I see lots of opportunities for improvement: Paint drips, visible tape lines, wobbly forks, handlebars coming loose, etc. However, the joy I brought to my wife and daughter when they walked in the parade made that all fall away. They were the envy of our 501st Legion group and the kids loved seeing them walk in the parade.
My main design goals were achieved: The total weight of the rig was less than 25 lbs. The forks were 4 lbs, and the harness was 3 lbs. The frame (PVC only) weighed 10 lbs. The body, prior to foam or paint (but including the chicken wire, speakers and battery pack), was 17 lbs, so the foam and all those layers of paint really only added a negligible amount of weight. Both my models were able to wear the Speeder Bikes for the 2 mile route of the parade with only minor discomfort. And, if you stand back far enough, you can’t see my mistakes. 🙂
Total cost of parts just shy of $500 per bike. All things considered, this was one of my least expensive builds, so I was happy with that number.
My 3 key take-aways from seeing them in action on the parade route:
- I need to either add more friction into the handlebar joints so they don’t move as much and keep falling out, or just permanently glue them.
- The batteries were starting to run out of juice toward the end of the parade. I had been using them for testing, so I probably should have put in a fresh set prior to the parade. The amp circuit uses a LOT of juice. However, I’m concerned that I should have used C batteries instead of AA. At the time, I was afraid C batteries would be too heavy. But I think I could switch to C batteries and remove the bottles of Voss water and still achieve the desired balance.
- Having the Speeder Bike hang low (upper-thigh) limited the stride of the wearer. We quickly fell behind our group during the parade march. Not much I can do about that since my design goal was to make it look like the wearer was seated.
Currently, I have only one additional feature planned for the bikes. I’d like to put red LEDs just behind each of the fans to give the appearance of a hot engine. I have an extra switch and LED on the control panel that I’ve already designated for controlling these LEDs. Unfortunately, I just didn’t have time to install them before the parade. I’m not sure how visible they will be in bright light, but in the darkness of the parade, they would have provided a cool effect. That said, with the battery issue I mentioned above, these LED might just add an unnecessary extra drain.

6 Comments